Knowing how to operate a 3D printer includes learning how to calibrate the Z offset. The Z offset on the E2 from Raise3D has some capabilities that allow it to perform with high precision. Calibrating a Z-offset can feel overwhelming, but Raise3D improved one of the most common calibration methods to become a more straight-forward process for any user.
What is the Z – Offset and Why Does it Matter?
The Z-offset is the distance that the tip of the Z-probe moves before getting trigged. It is marked as “distance B” in the figure below. The Z-probe from Raise3D is designed with high precision (repeat error ≤ 0.012mm) giving it the ability to treat the distance between the tip of the nozzle and the trigger point (distance A in the figure below) as a stable value. The proper Z-offset can be determined automatically by adding the value A to the Z-offset (distance B). Keep in mind that the B distance varies slightly between probes, so achieving optimal results requires finding the correct B value for each printer.

Figure 1: Probe trigger height
What is the Best Way to Calibrate the Z-Offset?
One way for users to calibrate the Z-offset is to observe the outcome of the first printed layer, then manually set the height differences values(as shown in Figure 2). If the nozzle is too high, then the value will be too small. If the nozzle is too low, then the value should be reduced.
Overall, this method requires repeated printing and measurement, which is tedious, complicated, and inefficient.
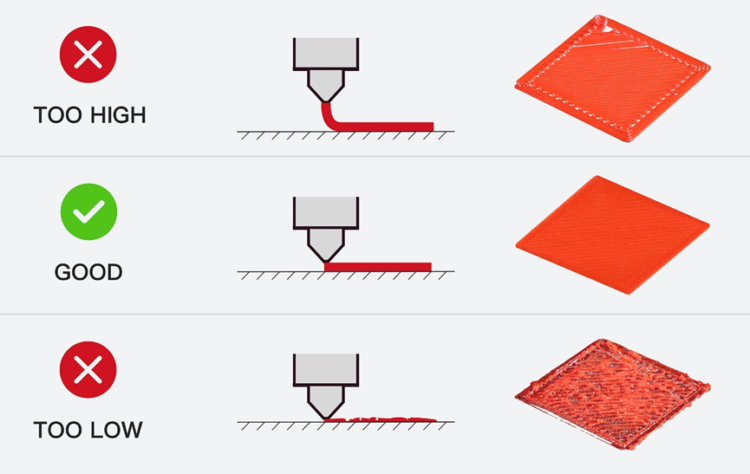
Figure 2: Guidelines for manually adjusting the Z-offset value based on first layer results
Raise3D built on the core principle of this method and developed some preliminary improvements. The user would be presented with multiple lines at a time, with each line using a slightly increased printing height. The user would then compare all the lines and select the one with the best printing quality. This method greatly reduces measurement times.
However, our double-blind trials found two main concerns regarding this method:
1. Because the difference between the printed straight lines is slight, it is difficult for users to determine which line achieves the best result.
2. “Best” is a subjective term, and individuals have different standards for “line quality”. This resulted in deviations as great as 0.5mm between values identified as the “best” printing height.
Due to these concerns, Raise3D wanted to find a measurement method with less variability. Testing showed that when the nozzle is a certain height above the heatbed, the printed line will become wavy, but if the nozzle is below this height, the printed line will not be wavy. Selecting the first wavy line in a series is a more straight-forward task than choosing the “best” line, which resolves issue 1.
After that, double-blind trials tested whether the first wavy line is a stable indicator. The results of these trials would show whether this updated process removes the subjectivity and variability discussed in issue 2.
The double-blind trial results are as follows:
| Relative Error Compared to Standard Value | ||
| <=0.05mm | <=0.1mm | <=0.12mm |
| 95% | 99% | 100% |
Figure 3: Relative Error Compared to Standard Value.
Based on this trial result, this method resolves issue 2, and can be used to clearly and stably measure the height differences between the nozzle and the probe’s trigger point. Therefore, the E2’s offset calibration based on this method.
Some Factors Can Affect the Outcome When Using Offset Calibration
1. Different filaments will cause significant deviations in the offset calibrations measurement results
We have explored the principle of wavy line generation. Melted filament, as anon-Newtonian fluid, will generate the Liquid Rope-Coil Effect when extruded at a certain height. When the printer head moves, the rope coil is pulled, producing an even wavy line. The main influencing factors of the Liquid Rope-Coil Effect are the melt flow index of the non-Newtonian fluid, the extrusion height, and the extrusion speed. When different filaments melt at the same temperature, the non-Newtonian fluids have large differences in melt-index. This means that filaments with different diameters under the same feed rate may have different extrusion speeds. These differences affect the height of the wavy line, which can lead to large deviations in the offset calibration measurement results.
The measurements of the offset calibrations results were compared to measurements taken with high-precision instruments to find the deviation between them. So far this comparison has only been made using Raise3D Premium PLA filaments.
For third-party filaments, users can utilize the values from the offset calibration that was performed with Raise3D Premium PLA. All filaments are different, so small adjustments may need to be made depending on the results of the first layer. Exploration on how to make the offset calibration more compatible with third-party filaments is still ongoing.
2. The center of the print surface must be flat
Since the offset calibration prints lines in the center of the print surface, applying glue or other surface treatments may affect the accuracy of the final values. It is also important that the bed be as level as possible to achieve an accurate offset value.
3. How can the printer’s Z-offset be adjusted?
There are two ways that you can adjust the Z-offset:
1. You can use the calibration menu to automatically calibrate the Z-offset. On your printer’s screen, tap “Setting>Maintenance>Offset Calibration”.
2. You can manually modify the offset in “Setting>More Settings>Hardware>Z Probe Offset”. Increasing this value will reduce the Z-offset, and decreasing this value will increase the Z-offset.
Connect with Raise3D:
Have you had a great experience with Raise3D that you would like to share? Please contact us at inquiry@raise3d.com. We look forward to hearing from you.
For more information about Raise3D printers and services, browse our website, or schedule a demo with one of our 3D printing experts.
